How to get rid of ticks on dogs safely comes down to two things: removing the tick correctly and managing what happens after, because the real risk is irritation, infection, or exposure to tick-borne illness.
If you’ve found a tick, it’s normal to feel a little panicky, especially if your dog is wiggly or you’re not sure how long the tick has been attached. The good news is that careful removal usually solves the immediate problem, and you can follow up with prevention so it doesn’t turn into a weekly routine.

This guide focuses on practical, low-drama steps: what tools to use, what not to do, how to clean the bite site, and when it’s smarter to call your vet. I’ll also cover prevention choices, because removing ticks once is fine, removing them every few days is a sign the plan needs adjusting.
Why ticks on dogs are a bigger deal than “gross”
Ticks aren’t just pests, they’re blood-feeding parasites, and in many parts of the U.S. they can carry infections. According to CDC, ticks can spread illnesses to people and pets, and early removal helps reduce exposure risk.
In real-world pet care, these are the common reasons dogs keep getting ticks or end up with irritated bite sites:
- High-exposure environments: tall grass, leaf litter, brushy trails, hunting fields, even some suburban yards.
- Gaps in prevention: missed doses, expired products, bathing/swimming that reduces effectiveness for some topicals.
- Removal mistakes: squeezing the body, twisting too hard, or using “home remedies” that can worsen skin irritation.
- Fur and skin factors: dense coats hide ticks, and sensitive skin reacts more.
One more thing people underestimate: dogs can carry ticks into the house, and then ticks can end up on humans. So even if your dog seems unbothered, you still want a clean, contained process.
Quick self-check: what you’re dealing with
Before you remove anything, take 30 seconds to assess the situation. This reduces the chance you leave mouthparts behind or miss a second tick.
Tick “status” checklist
- Is it attached? If it’s crawling on fur, you can pick it off with tissue or a lint roller and still check the skin.
- Where is it? Common spots: ears, around eyes, under collar, between toes, armpits, groin, tail base.
- Does it look swollen? A plumper tick may have fed longer, which is a reason to be more alert for symptoms later.
- How does the skin look? Red, oozing, or very painful areas can signal irritation or infection.
- How is your dog acting? Lethargy, feverish behavior, limping, or not eating is a “pause and call” sign.
If your dog is anxious or snappy, it’s okay to split the job: one person holds and distracts with treats, the other removes the tick.
How to remove a tick safely (step-by-step)
For most pets, the safest method is using fine-tipped tweezers or a tick-removal tool, getting close to the skin, and pulling straight out with steady pressure. According to AVMA, prompt, proper tick removal is important, and squeezing the tick body can increase exposure to pathogens.
What you need
- Fine-tipped tweezers or a tick-removal hook/tool
- Disposable gloves (recommended)
- Isopropyl alcohol or soap and water
- Small container with lid or sealable bag
- Good light, and maybe a phone flashlight
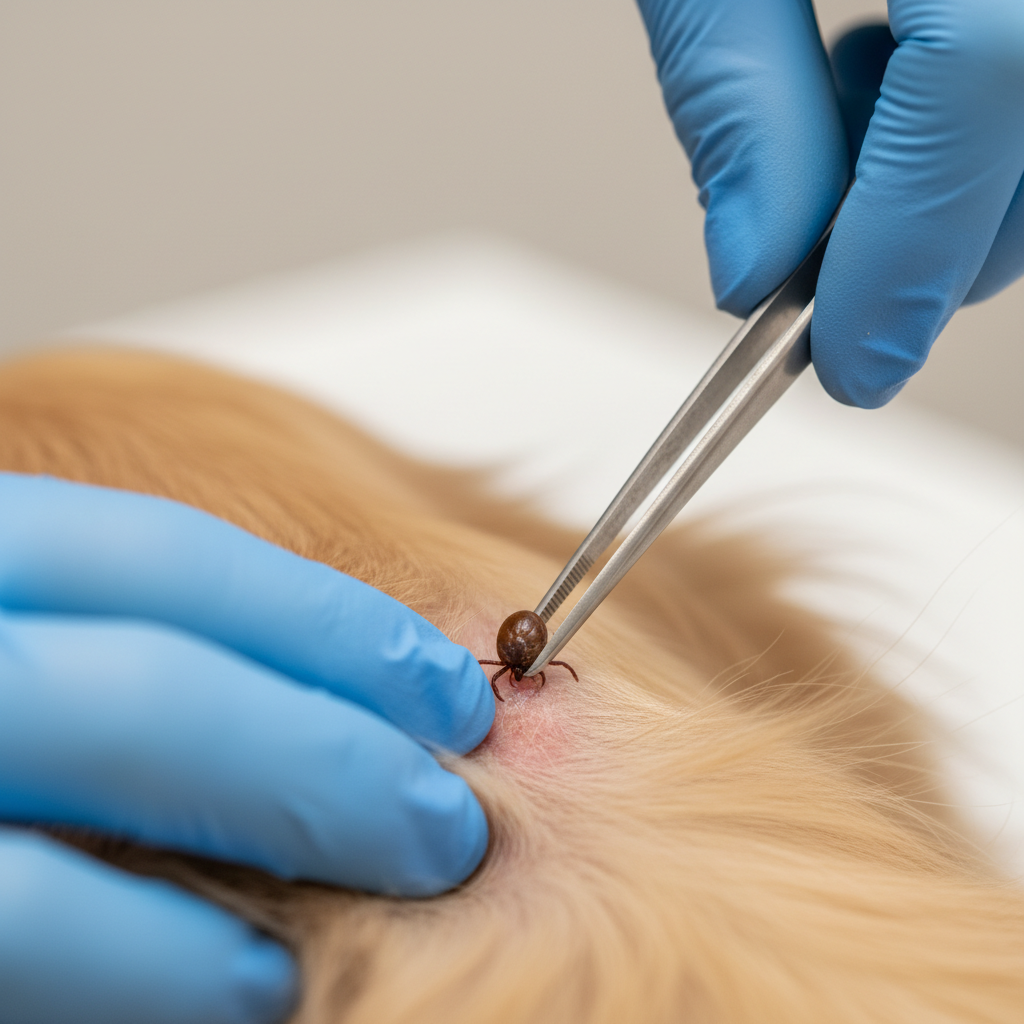
Removal steps
- Part the fur so you can see the tick and the skin clearly.
- Grip at the head: place tweezers as close to the skin as possible, aiming to grasp the tick’s mouth area, not the swollen body.
- Pull straight up with steady, even pressure. No jerking, no rapid twisting.
- Check the site: a small red bump can be normal, but watch for broken skin or swelling.
- Contain the tick in alcohol or a sealed bag. If your vet later asks for it, you’ll still have it.
If the tick breaks and you suspect mouthparts stayed in, don’t dig aggressively. In many cases, the skin pushes small fragments out over time, but if redness grows, there’s discharge, or your dog keeps scratching, a vet visit is the safer path.
What not to do (common “internet fixes” that backfire)
This is where people often make the situation worse, usually with good intentions.
- Don’t burn the tick with a match or lighter. You risk burns and still may not remove it cleanly.
- Don’t smother it with petroleum jelly, nail polish, or essential oils. It can irritate skin and may cause the tick to regurgitate.
- Don’t crush it with bare fingers. Use gloves or tissue, then wash hands.
- Don’t “yank and twist” like pulling a splinter. Slow, straight pressure is more reliable.
If you’re wondering about home sprays, especially essential-oil blends, be careful: some oils can be toxic to pets or trigger skin reactions, and label directions matter.
Aftercare: clean-up, monitoring, and when to worry
Once you get rid of ticks on dogs, the next win is preventing a bite site from turning into a skin issue, and catching early illness signs if they show up.
Clean-up steps
- Clean the bite area with soap and water, or a pet-safe antiseptic your vet recommends.
- Wash your hands, then disinfect tweezers/tools with alcohol.
- Vacuum areas where your dog rested after being outside, especially if you found multiple ticks.
What to monitor for (next 2–3 weeks)
- At the site: expanding redness, heat, swelling, pus, strong tenderness, persistent scabbing.
- Whole-dog symptoms: low energy, fever, limping, joint stiffness, reduced appetite, vomiting, pale gums.
According to FDA, tick and flea products can help reduce bites, but any illness signs after a tick exposure should be discussed with a veterinarian, since symptoms overlap across conditions and timing varies.
Prevention that actually fits your dog’s life (with a comparison table)
If you’re repeatedly searching how to get rid of ticks on dogs, that’s often a prevention mismatch: the product, schedule, or environment doesn’t line up with your dog’s exposure.
Here’s a practical comparison to help you think in “fit,” not hype:
| Option | What it’s good for | Common watch-outs | Best fit |
|---|---|---|---|
| Oral tick preventives (prescription) | Consistent protection without bathing impact | Needs vet guidance, not ideal for every dog | High-exposure dogs, frequent hikers |
| Topical spot-on treatments | Widely available, simple monthly habit | Must apply correctly, some dogs get skin sensitivity | Moderate exposure, routine yard time |
| Tick collars (vet-recommended types) | Longer duration, “set and forget” style | Fit matters, chewing risk, not all collars equal | Dogs who tolerate collars well |
| Yard and home control | Reduces repeat exposure around your property | Takes ongoing effort, may need professional help | Homes with heavy tick pressure |
In many households, the best results come from combining a vet-approved preventive with simple routines: check after walks, keep grass trimmed, and wash bedding regularly.
Practical routines: a “tick check” you’ll actually keep doing
Daily perfection isn’t realistic, but a fast routine is. If you want to get rid of ticks on dogs before they attach for long, consistency matters more than fancy tools.

A simple 3-minute checklist
- Run hands against the grain of the fur, feel for small bumps.
- Check ears, neck, collar line, chest, armpits, belly, groin, tail base.
- Look between toes and around paw pads.
- Brush or comb dense coats, especially after woods or tall grass.
Key takeaways to remember
- Use tweezers or a tick tool, pull straight out, steady pressure.
- Avoid “smothering” or burning; it can worsen skin irritation and risks incomplete removal.
- Monitor for symptoms for a couple weeks, especially if the tick looked engorged.
- Prevention is the long game, talk with your vet about the best match for your dog.
When to call your vet (or seek more help)
Sometimes removal is easy, but the context is not. It’s wise to contact a veterinarian if any of these apply:
- You can’t remove the tick fully, or the area becomes increasingly inflamed.
- The tick is attached near the eye, inside the ear, or another delicate area.
- Your dog shows lethargy, fever, limping, weakness, appetite changes, or vomiting after exposure.
- Your dog is very young, senior, pregnant, or has a chronic condition, and you’re unsure which preventives are appropriate.
Also, if you’re dealing with repeated ticks despite preventives, your vet can help troubleshoot product choice, dosing timing, and local tick pressure. That’s usually faster than trial-and-error shopping.
Conclusion: safe removal plus prevention beats repeated panic
Once you learn how to get rid of ticks on dogs safely, the process gets a lot less stressful: steady removal with the right tool, basic cleaning, then a short period of monitoring. The bigger win, though, is dialing in prevention that matches your dog’s actual routine and your region’s tick season.
If you take only two actions this week, make them these: keep a small tick-removal kit where you store the leash, and ask your vet which tick preventive makes sense for your dog’s age, health history, and exposure.
FAQ
- What is the safest way to remove a tick from a dog?
Fine-tipped tweezers or a tick tool, gripping close to the skin and pulling straight up with steady pressure tends to be safest and simplest for most dogs. - How do I know if the whole tick was removed?
You usually see the tick intact, including the head area. If you suspect tiny mouthparts remain, avoid digging, monitor the site, and call your vet if redness or discharge increases. - Can I use rubbing alcohol to make a tick let go?
Alcohol works well for killing and storing the tick after removal. Using it on an attached tick to “force release” is less reliable than proper mechanical removal. - How soon should I worry about Lyme disease or other tick-borne illness?
Timing varies by illness and dog, so there isn’t one perfect window. If your dog shows fever, limping, low energy, or appetite changes in the weeks after a tick bite, talk with your vet. - Do I need to save the tick after removing it?
It can help. Keeping it in a sealed bag or small container with alcohol gives your vet more context if symptoms appear, though testing needs vary by clinic and region. - Why does my dog still get ticks even on prevention?
In many cases it’s missed doses, incorrect application, product mismatch for local ticks, or constant high exposure. Your vet can help adjust the plan rather than guessing. - Is it safe to use essential oils to repel ticks on my dog?
Be cautious. Some essential oils can be harmful to pets or irritate skin, and quality varies. It’s safer to use vet-recommended preventives and ask your veterinarian before applying any DIY mix.
If you’re dealing with frequent ticks and want a more straightforward plan, your veterinarian can help you choose a prevention option that fits your dog’s habits, then set up a simple check routine that’s easy to stick with during peak season.