Pet first aid essentials are the small, boring items you only notice when you need them at 11 p.m. and everything feels urgent. A solid home kit will not replace a veterinarian, but it can buy time, prevent a minor injury from turning into a big one, and help you stay calm enough to make good decisions.
Most pet emergencies at home are not dramatic movie moments, they are simple problems that get worse when owners scramble: a torn nail, a cut paw pad, vomiting with dehydration risk, a reaction to a sting, or a cat who hides and refuses food. If you already have the right supplies and a short plan, you’re less likely to improvise with unsafe household products.
This guide gives you a realistic pet first aid kit checklist, explains which items matter for dogs versus cats, and walks through practical steps for common situations like minor cuts, choking risk, or transport to urgent care. I’ll also flag what not to do, because some “helpful” internet tips can create new problems.
What “essentials” really mean for pet first aid at home
For most U.S. households, emergency care for pets at home comes down to three goals: control bleeding, prevent contamination, and keep your pet stable until you can reach a clinic. That’s why the best kits are not huge, they’re organized and easy to grab.
It also helps to separate supplies from skills. Supplies are the gauze and antiseptic. Skills are knowing when to muzzle a stressed dog, how to check gum color, and when “wait and see” becomes dangerous. According to the American Veterinary Medical Association (AVMA)… keeping a pet first aid kit and knowing basic first aid can help you respond quickly while you contact a veterinarian.
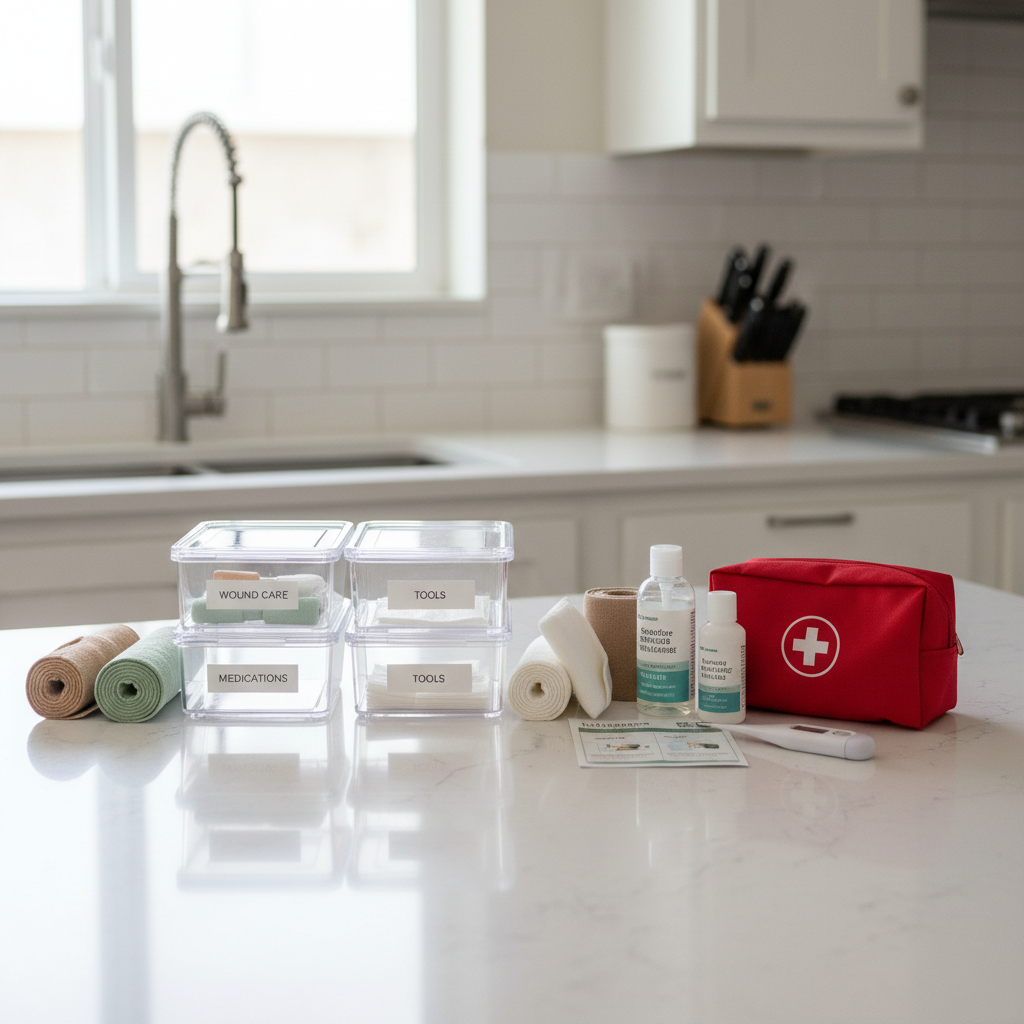
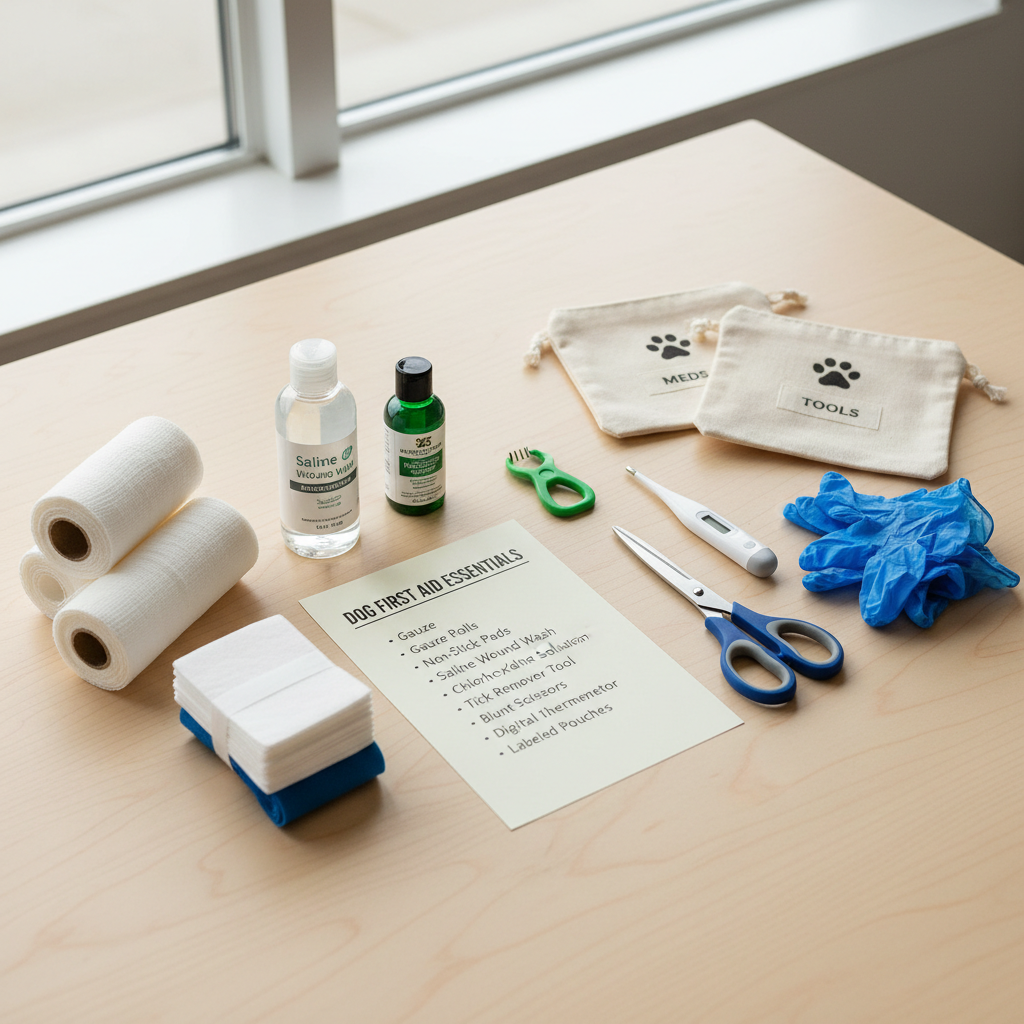
Pet first aid kit checklist (home kit) with what each item is for
Think of this as the baseline what to put in a pet emergency kit list. You can build it from a human first aid kit, but a few pet-specific items matter.
| Category | Item | Why it matters |
|---|---|---|
| Wound care | Non-stick sterile pads, gauze roll, cohesive wrap (self-adhering), medical tape | Controls bleeding, protects cuts, holds dressings without sticking to fur |
| Cleaning | Sterile saline (wound wash), chlorhexidine solution or povidone-iodine (properly diluted) | Flushes debris, reduces bacteria load before bandaging |
| Tools | Blunt-tip scissors, tweezers, tick remover, flashlight/headlamp | Safer trimming, debris removal, spotting punctures or ticks |
| Monitoring | Digital thermometer (pet-dedicated), water-based lubricant, disposable gloves | Tracks fever risk, improves hygiene and handling |
| Stabilizing | Soft muzzle (dog), towel/blanket, instant cold pack | Reduces bite risk, keeps warm, helps swelling or heat |
| Admin | Vet and ER numbers, vaccination record photo, medication list | Saves time during triage and phone consults |
Key point: for pet wound care supplies, the most useful “extra” is volume. Saline and gauze disappear fast when you’re flushing a dirty paw wound.
Dog emergency medical supplies: add-ons that earn their space
- Extra cohesive wrap for active dogs who shake bandages loose.
- Bootie or paw cover for short walks to potty while a paw bandage stays clean.
- Benadryl? Only if your vet has already confirmed dosing for your dog and scenario. Don’t guess, and avoid if your dog has health conditions unless a professional advises it.
Cat first aid kit must haves: keep it simple and low-stress
- Thick towel for “cat burrito” restraint during minor care.
- Carrier-ready plan: a carrier stored open, plus a familiar blanket inside.
- Saline and non-stick pads are usually more useful than lots of tools, many cats will not tolerate fussing.
Quick self-check: do you actually have the essentials (and can you find them fast)?
This is the part most people skip, then regret later. Use this 2-minute check to see whether your kit is truly “ready” for pet first aid essentials situations.
- Grab test: Can you pick up your kit in one move, with one hand?
- Light test: Do you have a flashlight/headlamp for power outages or backyard injuries?
- Flush test: Do you have enough saline to rinse a wound for 60–90 seconds?
- Wrap test: Do you have gauze + cohesive wrap, not just adhesive bandages?
- Contact test: Are the nearest ER vet and your primary vet numbers saved and written down?
- Expiration test: Any solutions, sterile items, or meds expired or opened long ago?
If you fail two or more, don’t overthink it, build a small kit that works today, then upgrade over time.
How to treat dog cuts at home (minor wounds) without making things worse
How to treat dog cuts at home depends on depth, location, and contamination. If it’s a shallow cut and your dog acts normal, you can often do basic care safely, then watch closely for infection signs. If it’s a puncture, a deep tear, a wound over a joint, or the bleeding won’t stop, call a vet right away.
Step-by-step for minor cuts and scrapes
- Control bleeding: Apply steady pressure with sterile pads for 3–5 minutes. Don’t keep peeking every 10 seconds, it resets clotting.
- Rinse thoroughly: Use sterile saline to flush out dirt. Tap water is sometimes used in a pinch, but saline is more predictable and gentle.
- Clean the surrounding skin: Use a pet-safe antiseptic. For many households, the best antiseptic for dogs and cats is either chlorhexidine (commonly used in veterinary settings) or diluted povidone-iodine, but concentration matters, so follow product directions or your vet’s guidance.
- Cover if needed: Non-stick pad + gauze + cohesive wrap. Leave toes visible on paw wraps so you can spot swelling.
- Stop licking: Use an e-collar or recovery collar. Licking is a top reason “small” wounds turn into hot spots or infections.
When to stop home care and call: limping that worsens, swelling, bad odor, pus, heat, pain that escalates, or your dog seems off. According to the ASPCA Animal Poison Control Center… some household antiseptics and cleaners can be harmful if licked, so it’s safer to stick to products labeled for pets and confirm questionable items with a professional.
Pet CPR and choking steps: what to learn now (and what to do in the moment)
Pet CPR and choking steps are not something you want to “figure out” during an emergency. The most realistic goal is to know the basics, then get hands-on training when you can.
If you suspect choking
- Look first, don’t sweep blindly: If you can see an object at the front of the mouth, you may be able to remove it carefully. Blind finger sweeps can push items deeper, especially in small dogs and cats.
- Watch breathing effort: Loud distress, blue or gray gums, collapse, or inability to inhale means urgent action and an emergency vet call while you move.
- Transport matters: If your pet can breathe even a little, getting to a clinic may be safer than prolonged at-home attempts.
CPR basics (high-level)
- Check responsiveness and breathing, then call a veterinary ER or have someone else call while you act.
- Chest compressions vary by body shape and size, which is why an in-person class helps.
- Follow a reputable course: According to the American Red Cross… pet first aid training can teach CPR and emergency response skills; consider a class so you’re not relying on memory from an article.

Build a pet travel first aid kit (small, focused, actually portable)
A travel kit is not your home kit shrunk down, it’s the items you need when you’re away from your normal routine. The best pet travel first aid kit items are lightweight, leak-proof, and useful in messy places like cars, hotels, parks, and trails.
- Saline pods or small bottle for eye and wound rinsing.
- Non-stick pads + cohesive wrap (a little goes a long way).
- Tick tool and a small pair of tweezers.
- Disposable gloves and a few antiseptic wipes labeled pet-safe.
- Copies of medical info, plus a photo of current meds.
- Emergency contacts for your destination, not just your home vet.
If you hike or camp, add a bootie, extra water, and a way to keep your dog from overheating. For cats, travel stress often becomes the bigger “emergency,” so prioritize a calm carrier setup and familiar bedding.
Common mistakes and safety notes (this is where people get burned)
Having pet first aid essentials is great, but some actions backfire fast. These are the missteps that show up again and again.
- Using hydrogen peroxide on wounds: It can damage healthy tissue and slow healing. Many vets prefer saline flushing and an appropriate antiseptic instead.
- Over-wrapping paws: Too tight can cause swelling and circulation problems. Keep toes visible and recheck often.
- Sharing human pain meds: This can be dangerous for dogs and cats. If pain control is needed, call a vet.
- Ignoring punctures: Small holes can hide deep infection risk, especially from bites or outdoor debris.
- No plan for stress: A scared pet may bite, even if they are normally gentle. A towel, muzzle for dogs, and calm handling matter as much as supplies.
When to stop DIY and get professional help
Home first aid has a ceiling, and that’s normal. Call a veterinarian or go to an emergency clinic if you see any of the following, even if you have a great kit:
- Breathing trouble, repeated choking, blue/gray gums, or collapse
- Bleeding that won’t slow after 10 minutes of steady pressure
- Deep cuts, gaping wounds, bites, punctures, or wounds near eyes/genitals
- Suspected poisoning, seizures, severe lethargy, or bloated abdomen
- Heatstroke signs such as heavy panting, weakness, vomiting, or confusion
And if you’re unsure, it’s still reasonable to call. Many clinics can tell you whether to monitor at home or come in, and that guidance usually beats guessing.
Practical setup: keep supplies usable, not just “owned”
Here’s the part that makes a kit work in real life: store it where you can grab it, label it, and restock it. A kit buried behind holiday decorations is basically decoration itself.
- Use two kits: one home bin, one small travel pouch.
- Label sections: “bleeding,” “cleaning,” “tools,” “info.”
- Add a one-page cheat sheet: vet numbers, poisoning hotline guidance, and your pet’s baseline info.
- Set a calendar reminder: quick expiration check every 6 months.
Conclusion: a small kit, a clear plan, and fewer panicked decisions
If you take one thing from this, make it simple: pet first aid essentials work best when they’re easy to find and easy to use, even when you feel stressed. Build the baseline kit, practice locating it fast, and learn the few skills that match the emergencies most likely to happen in your home.
Your next step can be small: pick up saline, non-stick pads, gauze, cohesive wrap, and a pet-safe antiseptic, then save your nearest emergency vet contact. That combination covers more real-world situations than most people expect.
FAQ
What should be in a pet first aid kit checklist for most homes?
Start with wound basics (saline, non-stick pads, gauze, cohesive wrap), a pet-safe antiseptic, gloves, scissors, tweezers, a flashlight, and your vet/ER numbers. Build from there based on your pet’s habits and health needs.
What are the most important dog emergency medical supplies for active breeds?
Extra wrap, more gauze than you think, and something to protect a paw bandage during potty breaks usually matter more than fancy tools. Active dogs are hard on bandages, so durability and volume win.
What are cat first aid kit must haves if my cat hates handling?
Prioritize low-handling options: towel restraint, saline rinse, non-stick pads, and a ready carrier. Many cats do better with quick stabilization and prompt veterinary care than prolonged at-home treatment.
What is the best antiseptic for dogs and cats?
Many vets commonly use chlorhexidine or properly diluted povidone-iodine, but product concentration and location of the wound matter. If you’re unsure, ask your vet what they recommend for your pet before an emergency happens.
How do I know if a cut can be treated at home or needs stitches?
If the wound gapes open, keeps bleeding, looks deep, or sits over a joint or near the eye, it often needs a vet. Punctures and bites also deserve a call, even when the surface looks small.
What should I put in a pet emergency kit for travel?
Keep it portable: saline pods, a few dressings, cohesive wrap, pet-safe wipes, tick tool, gloves, and medical info. Add destination-specific contacts because the nearest ER changes when you travel.
Can I use hydrogen peroxide to clean a pet wound?
It’s commonly suggested, but it can irritate tissue and slow healing. Saline flushing plus an appropriate pet-safe antiseptic is often a safer approach, and a vet can confirm what fits your situation.
Where can I learn pet CPR and choking steps safely?
Look for reputable pet first aid courses offered through recognized organizations or local training providers. Hands-on instruction matters because technique changes by size and body shape, and a trainer can correct mistakes early.
If you’re building a kit and want a more straightforward route, you can use this checklist as your shopping list and assemble it into two grab-and-go sets, one for home and one for the car, then ask your vet which antiseptic and dosing guidance make sense for your specific dog or cat.